API Ammonia Test Instructions: A Comprehensive Guide
The API Ammonia Test Kit is designed to measure ammonia levels in water accurately. It is essential for water quality monitoring, as high ammonia concentrations can harm aquatic life. Follow the instructions carefully to ensure precise results and maintain water safety standards effectively always.

The API Ammonia Test is a widely used diagnostic tool designed to measure ammonia levels in water. It is particularly popular among aquarium hobbyists, water quality professionals, and environmental monitors. Ammonia is a toxic compound that can harm aquatic life, even at low concentrations, making accurate testing crucial. The test kit provides a simple, efficient method to determine ammonia levels, ensuring the health and safety of aquatic ecosystems.

Developed by API, a trusted brand in water testing, the kit typically includes test strips or liquid reagents that react with ammonia to produce a color change. This colorimetric reaction is compared to a reference chart to determine ammonia concentrations. The test is designed to detect both free ammonia (NH3) and ionized ammonia (NH4+), which together represent the total ammonia present in the water. Understanding ammonia levels is critical for maintaining balanced water conditions, particularly in aquariums where fish and other organisms are sensitive to ammonia spikes.
Regular use of the API Ammonia Test helps prevent toxicity issues, ensuring a safe environment for aquatic life. Its simplicity and reliability make it an essential tool for anyone managing water systems. By providing quick and accurate results, the test supports informed decision-making to maintain optimal water quality. This guide will walk you through the process of using the API Ammonia Test effectively, ensuring precise and reliable outcomes every time.
Importance of Testing Ammonia Levels in Water
Testing ammonia levels in water is crucial for maintaining the health and safety of aquatic ecosystems. Ammonia, even in small concentrations, can be toxic to fish and other aquatic organisms, causing stress, illness, and death. In aquariums, ponds, and water treatment systems, ammonia testing helps prevent sudden spikes that can lead to biological imbalances. Regular monitoring ensures water quality remains stable, protecting aquatic life from harm.
Ammonia in water can originate from various sources, including decomposing organic matter, fish waste, and industrial discharge. Untreated, it disrupts the nitrogen cycle, leading to harmful conditions. The API Ammonia Test provides a reliable method to detect these levels, allowing prompt corrective actions to be taken. This is especially vital in aquaculture and aquarium-keeping, where the well-being of fish and plants directly depends on water chemistry.
By routinely testing ammonia levels, users can identify potential issues early, preventing severe environmental and biological consequences. This proactive approach safeguards aquatic health and supports sustainable water management practices. Regular testing is not just a precaution; it is a necessity for maintaining a thriving and balanced ecosystem in any water-based system. Accurate ammonia monitoring ensures the preservation of aquatic life and the overall integrity of water quality. Timely interventions based on test results can mitigate risks and maintain ecological balance effectively. Consistent testing fosters a healthier environment for aquatic organisms to flourish, making it an indispensable practice for water stewards worldwide;
Step-by-Step Instructions for Using the API Ammonia Test Kit
To use the API Ammonia Test Kit effectively, follow these steps:
- Gather Materials: Ensure you have the test kit, a clean glass test tube, test tube holder, and the water sample to be tested.
- Prepare the Sample: Collect a water sample and allow it to settle if cloudy. Avoid contamination by using a clean container.
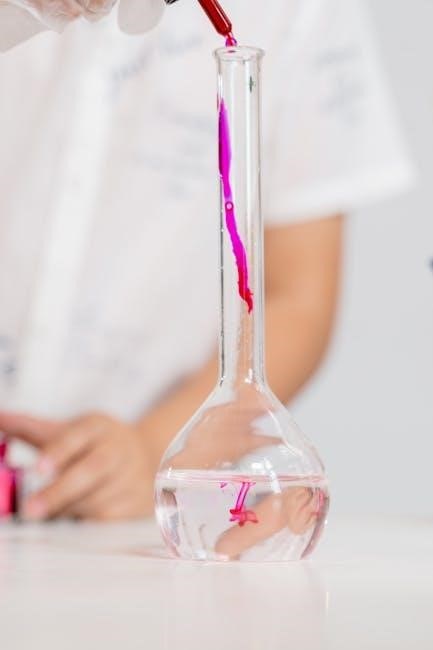
- Add Reagents:
- Add 8 drops of the NH3 reagent to the test tube;
- Fill the test tube with water sample up to the 5ml mark.

- Shake Gently: Cap the tube and shake it vigorously for 5 seconds to mix the reagent with the sample thoroughly.
- Compare Results: After 5 minutes, hold the tube against the color chart provided. Match the color to determine ammonia levels in ppm.
- Interpret and Act: If ammonia levels are high, take corrective actions such as performing a partial water change or adding a detoxifier.
By following these steps, you can accurately measure ammonia levels and maintain a healthy aquatic environment. Always refer to the kit’s instructions for specific details.

Safety Precautions When Handling the Ammonia Test Kit
Handling the API Ammonia Test Kit requires careful attention to safety to avoid hazards and ensure accurate results. Always wear protective gloves and eyewear to prevent skin and eye irritation from the reagents. Work in a well-ventilated area to avoid inhaling any fumes. If a reagent comes into contact with your skin or eyes, rinse immediately with plenty of water and seek medical attention if irritation persists. Keep the kit out of reach of children and pets to prevent accidental exposure. Never mix the reagents with other chemicals, as this could cause dangerous reactions. Store the test kit in a cool, dry place, away from direct sunlight and heat sources, to maintain the stability of the reagents. Dispose of any unused reagents and test materials according to local regulations to minimize environmental impact. By following these precautions, you can safely and effectively use the API Ammonia Test Kit to monitor water quality. Always refer to the safety data sheet provided with the kit for detailed information on handling and disposal.
Troubleshooting Common Issues with the API Ammonia Test

When using the API Ammonia Test Kit, several issues may arise that affect accuracy or ease of use. One common problem is inaccurate color matching due to faded or dirty color charts. To resolve this, ensure the chart is clean and well-lit, or replace it if faded. Another issue is reagent contamination, which can occur if bottles are not sealed properly after use. Always close reagent bottles tightly and store them upright to prevent spills and contamination. If test results are inconsistent, check the expiration dates of the reagents, as outdated chemicals may not perform reliably. Additionally, improper mixing of samples or reagents can lead to incorrect readings. Ensure all steps are followed precisely, including the correct ratio of sample to reagent. If the test solution does not change color as expected, verify that the reagents were added in the correct order and quantity. For persistent issues, consult the kit’s troubleshooting guide or contact the manufacturer for assistance. Regular kit maintenance and calibration can help minimize these problems and ensure reliable results.
Understanding and Interpreting Test Results
Interpreting the results of the API Ammonia Test is crucial for assessing water quality accurately. After performing the test, compare the color of the test solution to the color chart provided in the kit. The chart displays a range of colors corresponding to specific ammonia concentrations, measured in parts per million (ppm). Match the test solution’s color carefully to determine the ammonia level in your sample. It’s important to perform this comparison under adequate lighting and within the recommended time frame, as the color may fade or change if left standing too long. If the color matches exactly, note the corresponding value. If it falls between two colors, estimate the closest concentration. Be aware that high levels of ammonia can indicate pollution or improper water treatment, posing risks to aquatic life and human health. Record the results for future reference or further analysis. Always refer to the kit’s instructions for specific guidance on interpreting results, as variations in water samples may require additional considerations. Accurate interpretation ensures effective water management and safety measures.
Regular Maintenance and Calibration of the Test Kit
Regular maintenance and calibration of the API Ammonia Test Kit are essential to ensure accurate and reliable test results. Start by checking the expiration dates of the reagents and test strips, as outdated materials can lead to inaccurate readings. Store the kit in a cool, dry place, away from direct sunlight and moisture, to prevent degradation of the components. Before each use, inspect the test strips and reagents for any visible signs of damage or contamination. If any issues are found, replace the affected items immediately.
Calibration is a critical step to maintain the kit’s accuracy. Follow the manufacturer’s instructions for calibrating the test kit, which may involve using reference standards or control solutions. Clean the test kit components, such as cuvettes and droppers, thoroughly after each use to prevent cross-contamination. For long-term maintenance, perform a comprehensive check of the kit every six months, ensuring all parts are functioning properly. Replace worn or damaged items, such as the pipette tips or color charts, as needed. Regular maintenance not only extends the lifespan of the test kit but also ensures consistent and precise results. Always refer to the user manual for specific calibration and maintenance procedures, as improper handling can lead to inaccurate test outcomes.

Best practices include carefully preparing water samples, avoiding contamination, and using the correct amounts of reagents. Wearing protective gear, such as gloves and goggles, is essential for safety. Additionally, ensure the test environment is well-ventilated and free from interference. By adhering to these guidelines, you can ensure precise and consistent results, making the API Ammonia Test Kit a valuable tool for water quality management. Regular record-keeping of test results will also help in tracking changes in ammonia levels over time, enabling proactive measures to maintain water health;